Table Of Content

I recommend working with varied lines to achieve contours that feel natural. Let's start with a very geometric concept and observe how some varied line work can make for a more organic aesthetic. First, make, the clumps of hair bigger towards the base of the head, and then make them thinner as you move toward the ends. In addition to that, I will provide you with a free worksheet template based on strands. Additionally, be sure to comprehend the strand’s shadows for maximum depth.
Finally: Draw loose strands as final touch
So, grab your pencils, prepare your sketchbook, and let's embark on an artistic adventure into the captivating world of drawing curly hair. As you continue to draw individual strands of hair, the voluminous form you first sketched to indicate the hair will start to take on a more comprehensive look. At this stage, you should try to avoid drawing lines that overlap or otherwise duplicate those you’ve already drawn. You’re almost finished with your curly hair drawing, so just keep adding more texture lines, this time to the large curl near the side of the head. Once you have the lighting down, start drawing boundary lines between groups of hair that appear to be overlapping. Decide where you want the light to fall and then outline those areas using the shadow lining technique.
Step 12 – Mark the Lines on the Lower Half of the Page
Continue to fill the gaps of your curly hair drawing with hair lines on the opposite side. The next step when drawing curly hair is to draw a straight horizontal line to mark out where the upper part of the hair/head will come up to near the top of the paper. Another way you could make your curly hair drawing a bit easier would be by looking at photos of curly hair. You may know someone with similarly curly hair that you could use as inspiration. With all the kinds of hair you can draw, drawing curly hair is possibly the most dreaded type for artists to draw. Be sure to start drawing with very light lines as you will need to erase parts of it in some of the steps.
Step 1: Sketch wavy curl line
Shading that’s been done well can do more than just indicate where the light is coming from, however. Don’t think too hard about where you’re placing them as the lines should go wherever your pencil is drawn to. There’s no right position for curly hair to fall in, so it would look unnatural if you try to be too exact with your lines. That’s right, your curly hair drawing will start with just a single line.
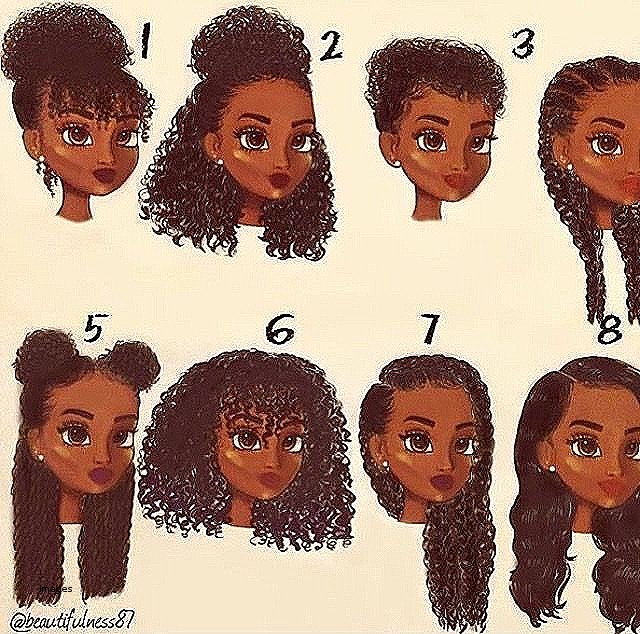
How To Draw Curly Hair
There are loads of details and intricate lines to do, and you could look into removing some of these details to make it easier. Now that you’ve drawn in your first bit of hair texture, you can start to add in even more. Once you’ve used two curved lines to create the jaw and neck of the head, you’re ready for step 2. To make things a bit easier for the next steps, you could use a light pencil to draw in a rough head shape that you can use to help orientate where you will place the hair. Similar to the first hairstyle begin by applying an initial series of strokes that will define the light, medium and dark areas of the hair.
Between these two lines, closer to the bottom one than the top, add a very small horizontal line. Approximately one quarter up from the bottom of the paper, draw another long horizontal line that should be a little longer than the horizontal line near the top of the paper. For example, my hair might feel a little "limp" if I get caught in the rain, but it doesn't compare to being fully saturated with water in the shower. My hair often takes a long time to dry, if I allow it to do so without any kind of styling tool. When parting coily, thick hair, you don't necessarily lose volume, even if the scalp is visible.
Understanding the fundamental principles of curly hair is essential for artists aiming to accurately portray its texture, volume, and movement in their drawings. No two curls are exactly the same in real life, so you wouldn’t expect them to be in a curly hair drawing, either. Starting from around the same point as the bottom of the first curl you drew on the left side of the curly hair drawing, create a new strand of hair that’s almost as long as the page. First, we’ll help you map out the head, on top of which the beautiful curly hair you’re about to draw will sit. Once you’re happy with the proportions for the head and face, which will act as your guide, we’ll provide a list of simple step-by-step instructions on how to draw curly hair.
Adding Highlights:
To make them more realistic you need to indicate individual hair to give the curly hair structure and flow. You can do this step in your mind and not draw it down if you have some experience drawing hair but I always try to at least put down some light lines. Be sure to create additional waves and curls as you get closer to the ends of your hair.
Tips and Tricks for Adding Realism
Now with the eraser, create clean lines that go from the center towards the edges of each section. What you have to do is choose one of the sections and erase the excess lines to have a more clear overview of which side of the hair will be closer to us. I’ll be using my 25 hair brushes for every hairstyle, but feel free to use any brush set you want. This should ideally be done sparingly, as these details do add to the image.
Artist Uses Cups as Canvas at a Starbucks Store in Bolivia - Starbucks Stories
Artist Uses Cups as Canvas at a Starbucks Store in Bolivia.
Posted: Thu, 15 Oct 2015 07:00:00 GMT [source]
Always begin by sketching a hair strand that flows downward in size since curly hair often has huge strands at the top and smaller ones at the bottom. Take the pencil tool and in a new layer, create soft curved lines similar to the ones you created on step 4. On this layer, start creating soft, sketchy lines in the outer sides of the sections that are closer to you. Following the guide image carefully, you could use lots of curved lines to make more curls and the top of the head.
Let's bring everything together in one stylistic drawing of a character with hair that has 4C, coily qualities. While this will vary based on hair style and cut, I like to think of it as more even weight distribution on the skull. You may have noticed that the curls have gotten tighter with each step, within the 4A, 4B, and 4C scale.
Add in the smallest sets of hair splits, folds and clumps to finish the line drawing. Erase the hairline and parts of the head covered by the hair once done. Finish the drawing by further darkening and smoothing out the overall shading. You should eventually have a line drawing with a good amount of details similar to the example above. Starting at the hairline, sketch a line to indicate the parting of the hair (whether it is in the center or to the side). If you enjoyed this tutorial, then you might want to have a look at our other drawing tutorials as well.
Avoid crossing over your lines or drawing over existing ones at this point. For this step, you’ll need to draw more hair lines on both sides, flowing past the neck. Going back up to the top of the hair, draw a few more hair lines on top of the first one, starting where you’d like the parting to fall. Remember not to press down too hard on your pencil here, as the curls you end up drawing will frame the face and fall past the neck due to their length, covering the lines. Highlights are as important as the shadows so try to pull out some highlights using an eraser or any craft knife by using a scratching technique to scratch the fine thin hair. This will give your drawing form and depth and give your study a more 3-dimensional structure.
This can be anywhere (left, right, center), but it may help to look at a couple of photo references first. People are some of the most fascinating and difficult subjects to draw. From rendering the complexity of eyes to the shapes of lips, there are many different nuances involved.


No comments:
Post a Comment